To give a branded look
for images makes post more attractive and clear. Images put the first impact on
visitors to attract them towards blog or
website. So, why do we not give the full attention on our content images look.
Here, we bring a tool, through this you can create attractive images that clear your content, brand or business according to you.
Let’s come on the point, that Online image tool is
Relaythat. Relaythat is an online image creator
site that helps you to create branded graphics design
pictures for multiple social media channels at one time.
Now we learn step by step, how to create a creative graphics
design for our site or blog.
1-) Sign Up With RelayThat:
Relaythat gives you the chance to create free sign up
account, which allows you to download five images per month and create three
projects. To get unlimited downloads, remove the RelayThat watermark, after
upgrade it.
After signup process completed, login your account then you
can starts with default projects and two sample projects.
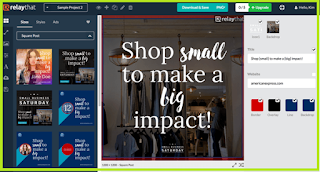
From left to right, the toolbar icons at the top of the
screen allow you to open the master element design for the current project and
add, duplicate, rename, or delete a project.
Use the drop-down menu to choose a
project to work with. The menu on the left side of the screen allows you to
change sizes and design styles.
+icon is for create the new projects. When we click on
+icon, the new project window will open. Enter the project name here and click
on create button.
Eye icon is to open the master layout for your project, which
includes all of the text and image assets.
The center of the screen displays the main design of your
project, and your picture and text elements are displayed on the right.
RelayThat uses the items you add to the main design to complete all individual
templates. Of course, each design can also be edited by itself.
2-) Add Image Assets to Your Project:
You can add all of the image assets in your projects.
Select Stock Image Assets
Relay that includes photos from free photo databases,
graphic backgrounds and gradients. To access these resources, click on the
image icon in the menu bar on the left and use the search box to find the image
you need.
For example if you are creating graphics for your clothes
business then you might search for the word “clothes” in the search bar and
drag them into center layout.
One thing is necessary to note that, you can’t move the
image around the layout, if you want to replace the image you need to drag a
new image.
RelayThat give you the option to import your image from
computer. On the right hand side, you could see the options for upload photos (photo1,
photo2...) from PC.
You can easily change the image size and style in master
layout. On the left side, you could see the slider of zoom, through this you
can change the size of images that you choose in master layout.
As you select your image in master layout, you could see the
image editor option on left side.
Upload Logo for Business:
As you have seen in master layout, there are the two Icon
options such as icon1 and icon2. These options are for to upload your business
logo. One Icon is in rectangle and second is in square. You can choose the icon
thumbnail which is fit for your logo.
Use Backdrop:
The background of your project can be anything you want: a
photo, a texture or a gradient. There are many things to choose from in the
app. You can choose any background images, colors, background layout color,
lines and all. You can see this option on the right side after scrolling it.
3-) Title & Text in project:
You can add more text in your images like title, subtitle, #hash
tag, one word, website call to action etc. Adding this text, you can make your
images meaningful and attractive. You can choose the text fonts after clicking
text icon.
4-) Choose a Design for Your Graphics:
You can pick the design you want to use for your promotional
graphics. Click on Sizes to explore graphic designs of different sizes, such as
square post, wide post, Twitter header, Facebook cover, LinkedIn profile cover
and more. All of these individual designs are completed in advance with the
image and text elements of your project's main design.
Resize and Mix Your Design:
After clicking the second option, you can see the variety of
resizing and remixing options for your layouts. Through this option, you can
make your graphics of different sizes and similar style.
5: Download Your Graphics:
After completing your graphics, you can download your images
easily. By default, it creates PNG format of images, but if you want to create
images in JPEG, select JPG option in drop down list. Keep in mind that if
you’re on the free plan, you get five downloads per month, so be sure that the
design is exactly as you’d like it.
Click Download & Save to download your file.
With the help of RelayThat Tool is graphic design maker site,
you can create promotional graphics for your content.


0 Comments